Jamberry Nail Shields are a high quality product you can trust. However, there can be a learning curve when it comes to perfecting your application technique. That’s where troubleshooting and application tips can be very helpful!
In my experience as a consultant, I have helped many customers troubleshoot the application process to get the best Jamberry experience possible. Below are a number of tips, tricks, and do’s and don’ts that can help you if you are experiencing any challenges with your Jamberry Nail Shields application that might be affecting long wear and enjoyment.
If you are finding that your Jamberry Nails are not staying on as long as you’d like, try some of the following tips. Almost always the problem can be easily resolved!
Troubleshooting and Application Tips
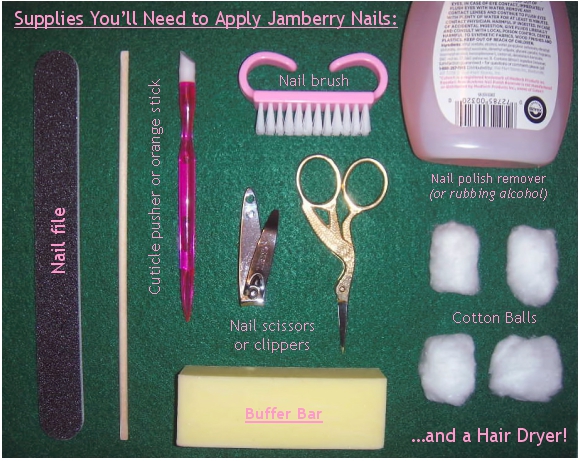
Have clean, dry, oil free nail beds. Clean, dry, and oil free nail beds are the key to successful Jamberry application. Many people have oily nail beds which will prevent a strong adhesion without proper preparation. Sometimes people aren’t aware that they even have oily nail beds. For this reason, I highly recommend using 91% Isopropyl Alcohol during the application process. If you are using nail polish remover, make sure it is REGULAR polish remover without any added moisturizers.
I have also heard wonderful things about using plain old blue Dawn dish soap to clean the nail bed prior to application. If you have particularly oily nail beds, you may want to consider purchasing a nail dehydrator at a beauty supply store to assist in drying the nail. Young girls are particularly likely to have oily nail beds, so these tips can be particularly helpful if your small child is experiencing difficulty with adhesion.
Prep each nail individually. I personally prep each nail individually before I apply each shield instead of prepping them all at once. This helps oils from having time to regenerate. For example, I push back the cuticle, shape, buff, and clean my thumb with alcohol and then apply the thumb shield. I then repeat these steps for my pointer finger, middle finger, etc.
Avoid too much contact with the adhesive on the back of the nail shield. The less your fingers come into contact with the adhesive on the back of the shield, the better. The oils from your fingertips transfer to the adhesive very easily and can affect adhesion. I use tweezers to hold the shield while I’m heating and positioning to help avoid touching the adhesive side with my fingers.
Make sure the shield does not touch any part of the cuticle. Jamberry Nail Shields will not adhere to skin so anywhere a shield comes into contact with skin, you will experience lifting – and lifting will leave you without a water tight seal. Always try and find the shield that BEST fits your nail from sidewall to sidewall. It’s better for the shield to be not quite wide enough than too wide. If any part of the shield is overlapping the cuticle, use small nail scissors to cut away excess so that the shield adheres to the nail only. Remember you can always trim shields down slightly before heating and applying as well to make this process easier.
Always use adequate heat and pressure to get a successful application. Heat and pressure are vital! Take enough time to thoroughly heat and smooth down each nail shield with a cuticle pusher. With heat and pressure most little ripples and bumps can be smoothed out. This also helps create the water tight seal you need for lasting wear.
Try aerosol hairspray to help adhesive. This is absolutely optional, but I have found that I can prolong the life of my Jamberry Nails if I add a quick spray of AEROSOL hairspray to my nail after I prep with alcohol and prior to heating and positioning the shields. I spray a thin coat of hairspray on the nail and hold it in front of my heat source to dry it thoroughly before I proceed with application. Most people do not find this step necessary, but it may be helpful to you if you are experiencing adhesion difficulties.
Properly file down the excess nail shield from the end of your nails. After you have trimmed away the excess shield from the end of the nail, be sure to file away the small remainder in a DOWNWARD motion. This helps create a seal at the tip of the nail. Fine grain files work great for this.
Brush nail glue onto your nail tips if you experience lifting at the tips. A small amount of nail glue across the tip can seal up the free edge. This is particularly helpful if you are rough on your hands, do a lot of typing, or wash your hands frequently. I also use a little bit of brush-on nail glue on my small, stubborn little toe nails where adhesion is sometimes difficult because the nail is so small. The same applies to small children. Brush-on nail glue can be easily and inexpensively purchased at a beauty supply store or store like Wal-Mart or Target.
Try a small personal heater for great results. I personally find using a hairdryer a bit cumbersome during the application process. When I became a Jamberry addict, I found that a $19.00 investment in the Jamberry mini-heater to be a life saver! While a hairdryer is a perfectly acceptable tool for application, I found that my application process got much easier, faster, and better once I made the decision to purchase the heater. It gave me the ability to use both hands freely instead of having to hold the hairdryer with one. For me, I love my Jamberrys so much that this investment was WELL worth it, even before I became a consultant.
Store your Jamberry Nails at room temperature. Excessive heat can affect the strength of the adhesive during future use. Avoid leaving Jamberry sheets in your car, in direct sunlight, or in your mailbox for long periods of time to ensure the adhesive remains strong.
Practice makes perfect! The more experience you gain with the application process, the better you will get at it. The best advice is to just take your time and be thorough with your application. Over time, applying your Jamberry Nails becomes easier and faster and results in awesome looks every time!
In my experience as a consultant, I have helped many customers troubleshoot the application process to get the best Jamberry experience possible. Below are a number of tips, tricks, and do’s and don’ts that can help you if you are experiencing any challenges with your Jamberry Nail Shields application that might be affecting long wear and enjoyment.
If you are finding that your Jamberry Nails are not staying on as long as you’d like, try some of the following tips. Almost always the problem can be easily resolved!
Troubleshooting and Application Tips
Have clean, dry, oil free nail beds. Clean, dry, and oil free nail beds are the key to successful Jamberry application. Many people have oily nail beds which will prevent a strong adhesion without proper preparation. Sometimes people aren’t aware that they even have oily nail beds. For this reason, I highly recommend using 91% Isopropyl Alcohol during the application process. If you are using nail polish remover, make sure it is REGULAR polish remover without any added moisturizers.
I have also heard wonderful things about using plain old blue Dawn dish soap to clean the nail bed prior to application. If you have particularly oily nail beds, you may want to consider purchasing a nail dehydrator at a beauty supply store to assist in drying the nail. Young girls are particularly likely to have oily nail beds, so these tips can be particularly helpful if your small child is experiencing difficulty with adhesion.
Prep each nail individually. I personally prep each nail individually before I apply each shield instead of prepping them all at once. This helps oils from having time to regenerate. For example, I push back the cuticle, shape, buff, and clean my thumb with alcohol and then apply the thumb shield. I then repeat these steps for my pointer finger, middle finger, etc.
Avoid too much contact with the adhesive on the back of the nail shield. The less your fingers come into contact with the adhesive on the back of the shield, the better. The oils from your fingertips transfer to the adhesive very easily and can affect adhesion. I use tweezers to hold the shield while I’m heating and positioning to help avoid touching the adhesive side with my fingers.
Make sure the shield does not touch any part of the cuticle. Jamberry Nail Shields will not adhere to skin so anywhere a shield comes into contact with skin, you will experience lifting – and lifting will leave you without a water tight seal. Always try and find the shield that BEST fits your nail from sidewall to sidewall. It’s better for the shield to be not quite wide enough than too wide. If any part of the shield is overlapping the cuticle, use small nail scissors to cut away excess so that the shield adheres to the nail only. Remember you can always trim shields down slightly before heating and applying as well to make this process easier.
Always use adequate heat and pressure to get a successful application. Heat and pressure are vital! Take enough time to thoroughly heat and smooth down each nail shield with a cuticle pusher. With heat and pressure most little ripples and bumps can be smoothed out. This also helps create the water tight seal you need for lasting wear.
Try aerosol hairspray to help adhesive. This is absolutely optional, but I have found that I can prolong the life of my Jamberry Nails if I add a quick spray of AEROSOL hairspray to my nail after I prep with alcohol and prior to heating and positioning the shields. I spray a thin coat of hairspray on the nail and hold it in front of my heat source to dry it thoroughly before I proceed with application. Most people do not find this step necessary, but it may be helpful to you if you are experiencing adhesion difficulties.
Properly file down the excess nail shield from the end of your nails. After you have trimmed away the excess shield from the end of the nail, be sure to file away the small remainder in a DOWNWARD motion. This helps create a seal at the tip of the nail. Fine grain files work great for this.
Brush nail glue onto your nail tips if you experience lifting at the tips. A small amount of nail glue across the tip can seal up the free edge. This is particularly helpful if you are rough on your hands, do a lot of typing, or wash your hands frequently. I also use a little bit of brush-on nail glue on my small, stubborn little toe nails where adhesion is sometimes difficult because the nail is so small. The same applies to small children. Brush-on nail glue can be easily and inexpensively purchased at a beauty supply store or store like Wal-Mart or Target.
Try a small personal heater for great results. I personally find using a hairdryer a bit cumbersome during the application process. When I became a Jamberry addict, I found that a $19.00 investment in the Jamberry mini-heater to be a life saver! While a hairdryer is a perfectly acceptable tool for application, I found that my application process got much easier, faster, and better once I made the decision to purchase the heater. It gave me the ability to use both hands freely instead of having to hold the hairdryer with one. For me, I love my Jamberrys so much that this investment was WELL worth it, even before I became a consultant.
Store your Jamberry Nails at room temperature. Excessive heat can affect the strength of the adhesive during future use. Avoid leaving Jamberry sheets in your car, in direct sunlight, or in your mailbox for long periods of time to ensure the adhesive remains strong.
Practice makes perfect! The more experience you gain with the application process, the better you will get at it. The best advice is to just take your time and be thorough with your application. Over time, applying your Jamberry Nails becomes easier and faster and results in awesome looks every time!
Got Curvy Nails? Having trouble with puckering or ridging along the tips? Here's some help!
The majority of ladies that love Jamberry do not have have an issue using the traditional application method. Most nails are pretty flat and easy to work with. The key to an awesome Jamberry application is evenly distributing heat to the entire nail wrap when it is on the nail so the adhesive is adequately activated. However, some of us experience puckering and lifting.
Let me introduce you to MY NAILS…
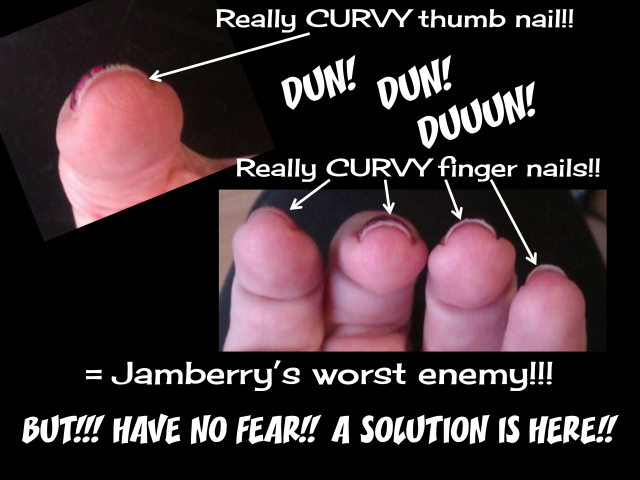
Yep! Curvy nails can be Jamberry’s worst enemy! Why? Well from my experience, I have determined that the heat from a heater or blow dryer just doesn’t hit the entire wrap as it sits on the nail well enough (unless you heat them until your fingers get 17th degree burns) AND because of the curve, puckering can happen on the sides and the top of the nail. Yes, that is my observation and hypothesis! lol
My first Jamberry application wasn’t great! The Jams still looked fabulous, lasted 21 days and no one really noticed the imperfections, but the puckering really annoyed me. I was determined to figure out why this was happening to me. So I did some research and learned about the curved nail issues some people were having. That’s when I discovered the rice bag application technique. So I decided to make myself a rice bag out the toe of an old sock. I filled the tip of the sock with long grain rice (you don’t need a lot), then I twisted a hair elastic around the sock and cut off the excess. (MAKE SURE THERE IS NO METAL IN THE ELASTIC BECAUSE YOU WILL PUT THE RICE BAG IN THE MICROWAVE) Then I heated the rice bag up for 15-20 seconds in the microwave and used it for my second application. WELL… It worked like a charm!! I don’t even use a heater anymore, I only use the "Rice Bag Application”!
Here are the steps:
Step 1: If necessary, remove nail polish with nail polish remover, then wash hands and clean nails. Use dish soap to make sure you remove any oils from your skin and nails.
Step 2: Cut and file nails to desired length and shape.
Step 3: Gently buff the top of the nail (optional), push back cuticle and thoroughly wipe down each nail with alcohol. Wait for it to dry.
Step 4: Match nail (finger or toe) to the nail wrap that best fits. (BE SURE TO SIZE DOWN. The adhesive will not stick to skin or cuticles and will cause lifting. A bit of nail showing on the side is not noticeable.)
Step 5: Peel back (with clean – oil free fingers) and cut only the portion of the nail wrap that you need and then apply the wrap to the nail without warming it up. Reposition if needed. **Keep in mind that the wrap will not stick well until it is heated, so continue with Steps 6 & 7, but do so carefully.
Step 6: Press and smooth out the wrap onto the nail with a rubber cuticle pusher or orange stick. Apply firm pressure from the centre out to the edges of the nail. Remember, it will not adhere completely until it is heated.
Step 7: Trim the top with scissors or sharp nail clippers.
Step 8: When you have completed 5 nails, heat up your rice bag in the microwave for 15-20 seconds (it should be fairly hot, but not hot enough to burn) and apply/rub it directly on the nail. Make sure you get the edges and the tips. After each heat, use the rubber cuticle pusher to seal the wrap around the cuticle and work out any ripples and then give it another rub with the rice bag.
Step 9: Complete all five nails and then trim and file off the excess wrap. (Make sure you FILE DOWNWARD)
Step 10: Repeat the steps for your second hand/foot. When your entire application is complete, heat up your rice bag again and heat each wrap for a few seconds each to ensure that heat is evenly distributed to the entire wrap and smooth out again with the cuticle pusher or orange stick.
HOPE THIS HELPS!!! HAPPY JAMMIN’!!
